
Once you have added the necessary courses from the course catalog you can begin to create sections or individual classes as well as assigning the teachers. Remember that at this point in scheduling we are creating cups to which we later add students.
- Creating Sections
- Adding a Primary Teacher or "Educator of Record"
- Adding a Additional Teacher or "Contributing Professional"
Creating Section
Step One: Head to the search section of Infinite Campus and choose "Courses/Section" from the drop-down menu. Click "Go" and your entire course list for your school will appear.
Click the course you wish to add a section to.
Step Two: Once you have selected your course you will go to the "Sections" Tab. Click the option, as seen below, to "Add a Section"

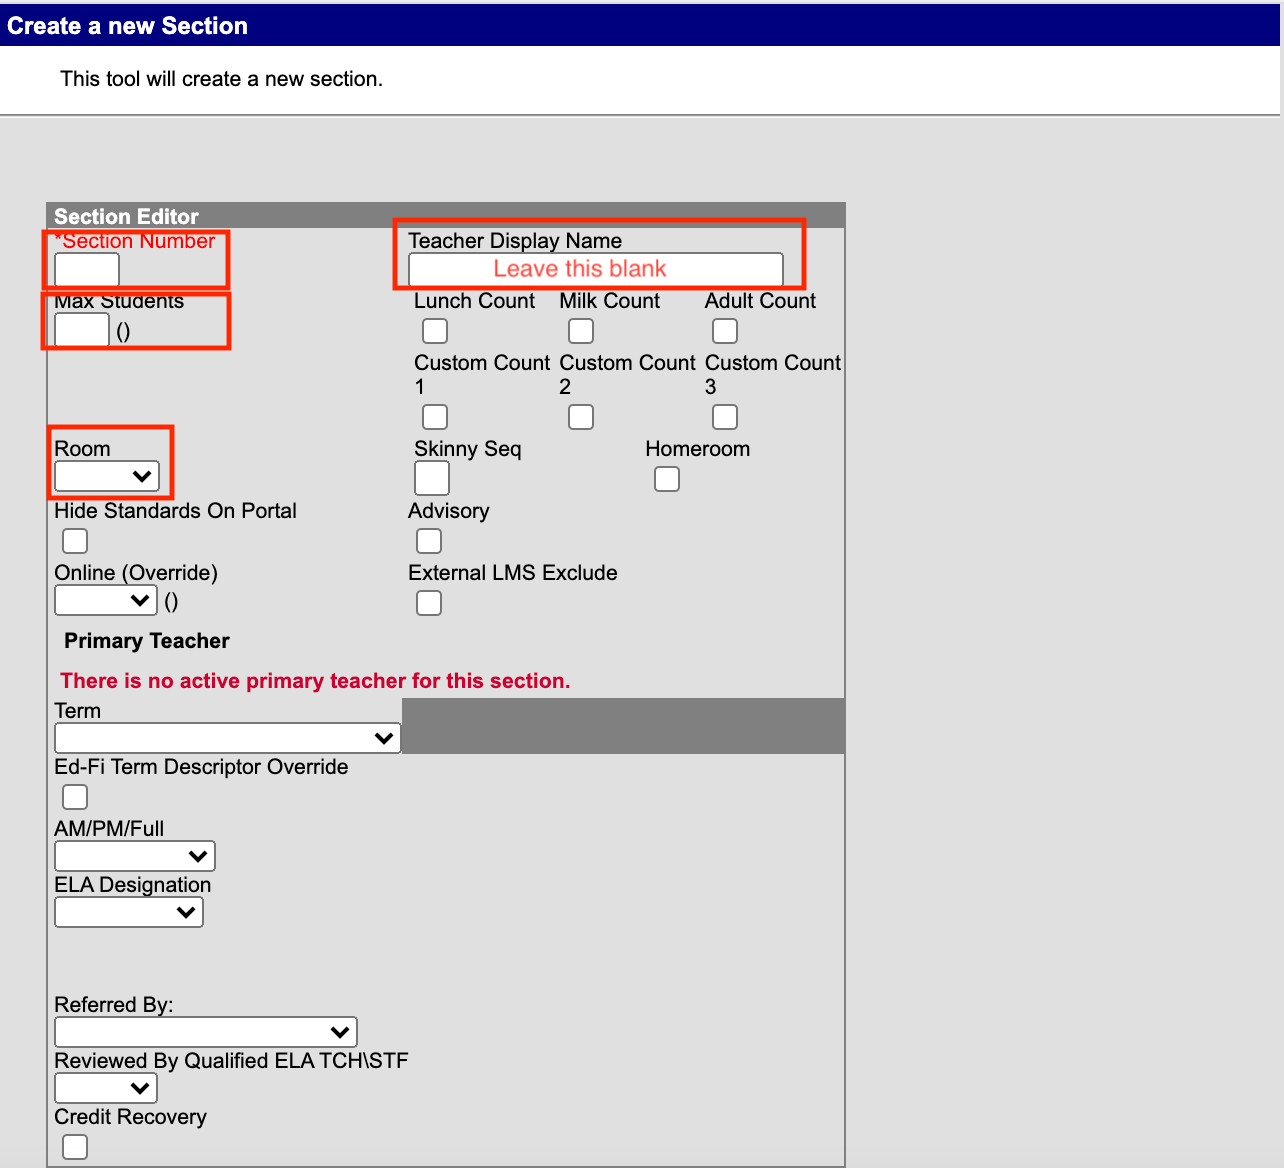
You should now see the "Create a new Section" window. You will need to enter a few important pieces of information at this point.
- Section Number: It is very important that we do no reuse section numbers. Many schools use numerical numbering systems. For example if you have multiple sections of a 7th Grade Course you might have Section 1, Section 2, etc. However if you have different grade levels within the course you might have 601, 701, 801, etc.
- Teacher Display Name: This should remain BLANK so you can add instructors later.
- Max Students: This is the maximum number of students allowed in this section.
- Room: Choose the room number from the drop down menu. If you need to add a room you can visit this Help Center Article for more information.
- There are other fields that might need to be filled out depending upon the course such as "Advisory" or Homeroom" and ELA Designation
Step Three: The last step is use the Section Schedule Placement window to check when this section will meet in your schedule. Schedules vary greatly across schools so note that your section schedule placement window will most likely look different than the picture below.
Check each box for the period, day, and trimester that this section will meet.

Step Four: When you are finished with your schedule for the course you can click "Create Section" at the bottom..

Adding Primary Teacher or "Educator of Record"
Step One: After your section is created you will need to assign a teacher to the course sections. Select the course and click the "Sections" tab. You will see any sections that you have created and on the left click the "Edit" button of the specific section you want to work with. 
Section Two: You will now see the section home screen. At the top click "Staff History". 
Every section MUST have a "Primary Teacher" or "Educator of Record" (these terms mean the same thing but are used in different places in IC). If you do not have a primary teacher or an Educator of Record this can cause difficult problems with other systems down the line. Click the "New Primary Teacher" button.

Step Three: You will now see a small box which we will need to completely fill out. The first thing is the "Teacher" drop down. Here you can select the primary teacher who is teaching this course. Here are a few different situations which may come into play at this point.
- If the course has more than one teacher we will add them later.
- If you do not see your teacher in the drop down menu and the teacher is new- the teacher's IC account is most likely not completed. Click here for more information about the timeline for accessing systems. If you do not have the correct teacher you will need to assign a "placeholder" until the accounts are finished.
- If the teacher is not new and does not appear in the drop down menu please submit a Help Desk ticket so we can contact DPS to correct this error.

Once you have added the teacher from the drop down menu our next step is the "Role". As this is the primary teacher you will select "Educator of Record". The last step is "Assignment Date". Almost always you will select "Unrestricted" which means there is no need to put in any dates. The specific dates should only used if there are changes to the teacher throughout the year.
Step Four: The last step is a small grey box at the bottom titled "Teacher Display Name on Section". You have two choices
- Using the current teacher (selected from the drop down) display name
- Typing a new teacher display name
Make your selection and click "Save".
Adding Additional Teacher or "Contributing Professional"
Step One: After your section is created you will need to assign a teacher to the course sections. Select the course and click the "Sections" tab. You will see any sections that you have created and on the left click the "Edit" button of the specific section you want to work with.
Section Two: You will now see the section home screen. At the top click "Staff History".
Every section MUST have a "Primary Teacher" or "Educator of Record" (these terms mean the same thing but are used in different places in IC). If you do not have a primary teacher or an Educator of Record this can cause difficult problems with other systems down the line. Since we have already done this we will click the "New Teacher" button. This will allow us to assign an additional teacher to this section.

Step Three: The first option is the teacher. You will select the teacher you are adding to this section by using the drop down menu. Here are some situations that may come into play right now.
- If you do not see your teacher in the drop down menu and the teacher is new- the teacher's IC account is most likely not completed. Click here for more information about the timeline for accessing systems. If you do not have the correct teacher you will need to assign a "placeholder" until the accounts are finished.
- If the teacher is not new and does not appear in the drop down menu please submit a Help Desk ticket so we can contact DPS to correct this error.
The next option is "Role" and since we already have an "Educator of Record" you will need to select "Contributing Professional". This will give all the same access to the teacher as the "Educator of Record". The only difference is that when searching IC or viewing this course on reports you will see the "Educator of Record" name not the "Contributing Professional".
Once you have added the teacher from the drop down menu our next step is the "Role". As this is the primary teacher you will select "Educator of Record". The last step is "Assignment Date". Almost always you will select "Unrestricted" which means there is no need to put in any dates. The specific dates should only used if there are changes to the teacher throughout the year.
Step Four: The last step is a small grey box at the bottom titled "Teacher Display Name on Section". You have two choices
- Continue using the current teacher (selected from the drop down) display name
- Typing a new teacher display name
Make your selection and click "Save".
Comments
0 comments
Please sign in to leave a comment.